
|
|

 Despite all efforts to prevent dirt and staining on new building construction, a final wash down is recommended. To minimize the severity of cleaning though, every effort should be taken to protect the cast stone during storage and installation. Storage of cast stone should be above ground on non-staining planks or pallets and away from heavy construction traffic. Cast stone stored for an extended period of time should be kept on pallets or non-staining planking and covered with non-staining tarps. After setting, columns, pilasters, entry jambs, windowsills and all stone with projecting profiles should be protected with non-staining materials during the remaining construction. Despite all efforts to prevent dirt and staining on new building construction, a final wash down is recommended. To minimize the severity of cleaning though, every effort should be taken to protect the cast stone during storage and installation. Storage of cast stone should be above ground on non-staining planks or pallets and away from heavy construction traffic. Cast stone stored for an extended period of time should be kept on pallets or non-staining planking and covered with non-staining tarps. After setting, columns, pilasters, entry jambs, windowsills and all stone with projecting profiles should be protected with non-staining materials during the remaining construction.
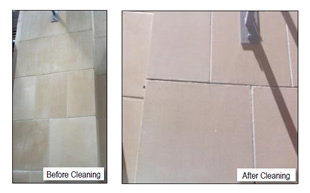
The most common stains due to construction are dirt, mortar smears and efflorescence. A general rule of thumb is to use the least aggressive cleaning material and method to clean the building. There are a variety of commercial cleaners available to remove mortar smears, dirt and efflorescence without altering the finish or causing damage to the cast stone. Most contain detergents combined with mild solutions of phosphoric and/or muriatic acids. Use only the commercial cleaner developed for the specific stain to be removed.
Dirt can be removed by scrubbing with a mild detergent and water and thorough rinsing. Extreme care should be taken when applying acidic based cleaners to areas where joints are left open or where joint sealant is used as jointing material. Hardened mortar stains are more tenacious and may require a more aggressive solution to remove. The manufacturers of adjacent building materials (clay brick, concrete block, windows, doors, sealant, etc…) should be consulted to determine compatibility with the cleaning materials.
Dunnage materials used in the packing and transport of cast stone can leave stains (or clean spots) after becoming wet. Wood packaging products can transfer resins to the surface, which may be easily removed. However, solid dunnage made from fresh timber can cause dunnage marks, which become difficult to remove. Packing and dunnage materials should always allow the exposed surfaces to breathe, especially when stones are palletized or placed into storage shortly after manufacture. This will avoid color differential due to moisture becoming trapped on the surface of the stone.
When unusual stains are encountered, the same procedures, which are recommended to clean concrete, will normally clean Cast Stone. The Portland Cement Association publishes a guide for the removal of stains in concrete.
 The most important step to stain removal is identifying the stain and its cause. Manufacturers of cleaners should be contacted for guidance on removing particular stains. For the best result, follow the manufacturer's recommendations for using their product. Any treatment should be tested in a small inconspicuous area prior to cleaning the main wall. Also, ensure that lower cast stone courses are frequently rinsed with water because as acid is rinsed down the wall it can gather strength when reapplied. Take necessary steps to protect windows door and grade materials. Cleaners not fully rinsed from the building may cause corrosion to embedded steel later. The most important step to stain removal is identifying the stain and its cause. Manufacturers of cleaners should be contacted for guidance on removing particular stains. For the best result, follow the manufacturer's recommendations for using their product. Any treatment should be tested in a small inconspicuous area prior to cleaning the main wall. Also, ensure that lower cast stone courses are frequently rinsed with water because as acid is rinsed down the wall it can gather strength when reapplied. Take necessary steps to protect windows door and grade materials. Cleaners not fully rinsed from the building may cause corrosion to embedded steel later.
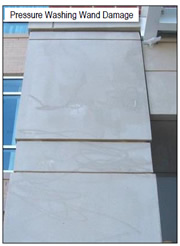
Direct high pressure power washing and sandblasting are not recommended procedures for cleaning cast stone. Furthermore, metal fiber brushes, rubbing stones and any tool or device that can scar the cast stone not to be used for cleaning cast stone.
|
< < < RETURN TO TOP

The proper use of cast stone in the design of a project and the job site handling of the cast stone can affect the overall performance. On-site personnel should be familiar with the Cast Stone Institute® specifications and the project specification covering delivery, storage, setting, touch-up and repair, cleaning, pointing, caulking and sealing. In case of a conflict between the two specifications, the project specification should take precedent. Where the project specification may not include a particular issue, the industry standards should be followed.
The following checklist has been developed for the handling and installation of cast stone.
- Prior to delivery there should be a set of the approved shop drawings and color and texture sample on file. All test reports specified should be submitted as required.
- Upon delivery, all cast stone should be checked for chips, cracks, stains, or broken pieces. Any damage should be noted on the delivery slips and communicated to the manufacturer.
- Color and texture should be inspected in accordance to approved color sample or mock-up panel set up at the job site. In general, the color and texture of the cast stone should be approximately equal to the approved sample when viewed in typical daylight conditions at a distance of twenty foot. (See Technical Bulletin #36 Inspection and Acceptance.)
- Storage of cast stone should be above the ground on non-staining planks or pallets. The storage site should be away from heavy construction traffic. Cast stone stored for an extended period of time should be kept on pallets or non-staining planking and covered with non-staining tarpaulins. Allow for air circulation.
- Prior to setting, ensure climatic conditions are within thermal limitations of mortar. Cast stone should not be set if the environmental conditions are not within the acceptable temperature range specified by the manufacturer's recommendations. Mortar set retarders and set accelerators should be used according to manufacturer's recommendations but not with touch-up and repair material.
- Set cast stone within size limitations in full mortar joints and fill in all dowel holes and anchor slots completely with project approved bonding material (usually Mortar, Non-Shrink Grout or Epoxy). Ensure uniform joint widths within specification tolerances. If shims are required in the mortar joints, mortar should be raked back and caulked to mitigate hairline cracking in the joints. Sealant joints may be sanded to give the appearance of mortar when desired.
- Ensure that all specified flashing and dampproofing is installed. Flashing pierced by stone anchors must be sealed either by metal thimble, grommet or approved sealant.
- Concrete should never be poured against unprotected cast stone. Where poured in place concrete is placed against cast stone sills, separate with an appropriate barrier material prior to pouring concrete.
- Cast stone anchors must meet specified standards and be non-corrosive. Cast stone slots to receive anchors should be completely filled with project approved material usually mortar, non-shrink grout or epoxy.
- Prior to setting, each surface to be set in mortar should be wetted before mortar is applied. This helps to secure the bond between the mortar and the cast stone and may help to prevent shrinkage and hairline cracking in the joints.
- Weep holes must be installed over windows, at relieving angles and at the bottom of walls. No mortar droppings shall be allowed in the wythe between back of stone and face of back-up structure.
- All joints in cast stone units, which are set using mechanical anchors and plastic bearing shims, should be sealed. All control joints and any floor line joints at relief angles should be sealed to allow for movement.
- Only the ends of load bearing lug sills shall be set in a full bed of mortar to prevent cracking from future wall settlement. After setting, prime the joints, insert properly sized backup rod and gun in sealant.
- All trim items must align with control joints.
- Bridge parapet coping units over control joints to maximize their effectiveness. All coping should have a minimum ½" wash to control runoff.
- Do not bridge parapet coping over expansion joints.
- Cast stone should be handled to minimize chipping. Handle stones with the wide portion of the cross section in the vertical position to minimize breakage.
- After setting, columns, pilasters, entry jambs, window sills and all cast stone with projecting profiles should be protected during the remaining construction.
- During construction, cover the top of the walls when rain is anticipated.
- Chipped cast stone must be patched by skilled labor. A trial patch must be approved before general touch and repair is to commence.
- Planter coping, fountain coping, swimming pool coping, treads, risers, stone pieces above grade, and pavers may be treated with a silane or silane/siloxane blend water repellent coating after setting. A waterproof product may be applied to the back, sides and at and below grade surfaces. This will minimize the likelihood of dirt and groundwater entering the surface of the stone; a frequent cause of staining, efflorescence and enhancement of crazing. Check that the water repellent coating does not affect color or texture when dry.
- Load bearing cast stone units should be reinforced as necessary. They may not be designed to be handled in a different orientation than they will be installed in the structure. Lintels and large panels must be kept vertical.
- Any exposed reinforcement is to be cut back to a minimum depth of 1.5 inches. Apply a galvanized compound, zinc primer or other reinforcement protection to all exposed reinforcement. Fill recessed pocket containing coated reinforcement with repair material prior to setting the cast stone.
- When installing in extreme weather conditions consult Cold Weather Setting Practices Technical Bulletin #41, and Hot Weather Setting Practices Technical Bulletin #48.
This Technical Bulletin addresses generally accepted practices, methods and general details for the use of Architectural Cast Stone. This document is designed only as a guide and is not intended for any specific application or project. It is the responsibility of design and construction professionals to determine the applicability and appropriate application of any detail to a specific project based on professional judgment, specific project conditions, manufacturer's recommendations and solid understanding of product characteristics. The Cast Stone Institute makes no express or implied warranty or guarantee of the techniques or construction methods identified herein. Technical references shall be made to the edition of the International Building Codes for the location of the structure, the latest edition of the TMS 402/406 Masonry Standards document and TMS 404, 504, 604 Standards for Design, Fabrication and Installation of Architectural Cast Stone.
The Cast Stone Institute (CSI) is a not-for-profit organization created to advance the design, manufacture and use of Architectural Cast Stone. To further this goal, the CSI continually disseminates information to targeted construction industry audiences through presentations, programs and technical publications. |
< < < RETURN
TO TOP

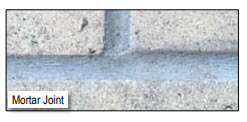
Selecting the appropriate type of mortar for setting cast stone is perhaps the most important factor in the performance of a masonry wall. The mortar must have sufficient strength, be durable, resist rain penetration as much as possible and yet be flexible enough to accommodate slight movement within the wall assembly.
As noted in TMS 604-16, Standard Specification for Installation of Architectural Cast Stone, mortars used in the setting of cast stone should meet the requirements of ASTM C270, Type N mortars. These mortars generally consist of one part cementitious material (Portland cement and lime, or masonry or mortar cement) to three parts of clean, washed masonry sand (ASTM C144). The mortar may also contain iron oxide coloring pigments (ASTM C979) and admixtures (ASTM C1384).
The selection of a Type N mortar provides good bond strength with desired weather resistance and sufficient compressive strength relative to the cast stone when cured. Plasticizing agents, such as lime or ground limestone, enhance the workability of the mortar while reducing shrinkage. The practice of wetting the head and bed joints of the stone and tooling the mortar when thumbprint hard will further protect against joint shrinkage. Although Type N mortar is the standard used with cast stone (as well as many natural cut stone), the proportions may be varied to suit specific applications.
Proper mixing is essential to good consistency. All materials, except pigments, should be measured by volume. Sands should be placed in the spiral-blade or paddle type mixer first, followed by pigments (if required), pre-water, lime and cement, final water and 5-7 minutes of mixing time. Due to the various admixtures available for mortar, consult with the manufacturer for recommended addition rates and mix sequencing. Mortars unused after 2 ½ hours should be discarded (this time may be shorter depending on the ambient conditions).
Head joints in most hand-set cast stone may be set with the usual wet consistency mortar used in setting brick and block. Stiffer mortar must be used when setting larger stones and shims are recommended for all pieces over 300 lbs. When setting, fill all dowel holes, anchor slots and similar building stone anchor pockets completely with mortar. Non-shrink grout or anchoring cement may be specified for dowel connections. Caution should be used when the bed joint is on horizontal flashing as it will act as a bond breaker. Special anchorage may be necessary to accommodate this condition as well as in the vertical joints of the first course below a relief angle. Mechanical anchors are recommended to be installed within the first course above and below each relief angle.
Mortar systems have the ability to carry loads but cannot absorb much joint movement. For this reason, thoughtful designers often require that joints at parapets, copings and other particularly sensitive areas be left un-mortared for later filling with sealants. A mortar lock feature may be incorporated in the sides of the cast stone in order to add positive engagement of the mortar element into the cast stone unit. This helps to restrain the cast stone if the shear bond is lost between the cast stone and mortar.
When using a post-setting pointing system, all stone-to-stone joints should be raked to a depth of ¾ in. for later pointing. It should be noted that in many cases, but in particular when setting small veneer pieces, it is not practical to rake out and point all joints. In these instances, full bed setting and finishing in one operation can be used. Particular attention must be paid to the waterproofing systems incorporated into the veneer. Stone-to-brick joints are usually struck and tooled to a concave shape (See Technical Bulletin
#44 on Pointing). Sponge all mortar smears from the face of the cast stone with water as hardened, mortar smears are difficult to remove from the surface of cast stone. Clean with water and a stiff fiber brush or with a commercial masonry cleaner approved for use with cast stone. Metal bristle brushes should not be used. Consult the cast stone manufacturer before performing any cleaning procedure. Direct high pressure power washers should never be used to clean cast stone. (See Technical Bulletin #39 on Cleaning).
If lug sills, which extend beyond the masonry opening, are fully set in mortar, the mortar at the ends under the lugs (where the load is) may, in certain situations, compress or shrink more than the rest of the mortar (due to overburden forces), causing shear or bending stress in the sill and possibly leading to failure. One of two techniques can be used when setting lug sills. The first technique is to set only the ends of lug sills in a full bed of mortar and point the portion of the sill inside the masonry opening after the initial mortar bed has cured. The second technique is to shim under the lugs to bear any compressive loads. The designer should examine the lug sill configuration and how it interfaces with the adjacent and under-supporting masonry units to ensure that point bearing will not occur at the mid-span of the sill. Slip sills, which do not extend past the masonry opening, do not carry any load other than itself and are set in a full bed of mortar.
Designers should specify where to use mortar/pointed joints and where to use sealant joints. Typically, conventional masonry cast stone units may be set with mortar joints. Where panels are larger than conventional masonry units (1 ft. 6 in. tall by 2 ft. 6 in. in length for vertical applications), "soft" sealant joints are generally recommended. In such unique cases, a professional designer or engineer should be consulted for proper joint design and function. After setting, prime the ends of the stones (if necessary), insert a properly sized backup rod followed by application of a sealant using a caulking tool.
Selection of Joint Type for Cast Stone
| Control or Expansion Joint Location |
Mortar/Pointed Joints |
Sealant Joints |
| Most bed joints |
Recommended |
As needed |
| Head joints at coping, joints at column covers, cornices, platforms, soffits, stone with projecting profiles, exposed top joints, rigid suspension connections |
Not recommended |
Recommended |
| Units larger than 1 ft. 6 in. x 2 ft. 6 in.* |
Not recommended for vertical applications |
Recommended |
*Proper joint design and function should be based on recommendations from an engineer or other design professional. For recommendations on sealants, please see
Sealants.
|
< < < RETURN
TO TOP

Tooled mortar joints are required for cast stone units larger than conventional masonry units because mortar shrinks modestly as it cures. Since mortar beds harden from the outside in, stresses can be applied to the edge of the stone which can cause spalling. Shrinkage also can create cracks at the joints; a condition which may lead to moisture penetration. Tooled mortar joints are best suited for masonry-bound trim items such as belt courses, lintels, window surrounds, date stones, inscription blocks, quoins, keystones and similar applications.
It should be noted that in many cases (and specifically when setting small veneer pieces) it is not practical to rake out and point all joints. In these instances, full bed setting and finishing in one operation can be used. Particular attention must be paid to the waterproofing systems behind and incorporated into the veneer.
Regardless of whether the mortar or sealant is selected as the face joint material, the mortar must be raked out of the joint to a minimum depth of 3/4 inch. If sealant is to be used at the head joints, then mortar is normally not used there at all.
Pointing is usually done in 1 or 2 stages to allow maximum sealing of shrinkage cracking in the mortar. It should not be done in areas exposed to hot sunshine and it is suggested that pointing be accomplished after touch and repair of cast stone and before final wash-down.
Apply pointing mortar using proper tools to compress the material against the edges of the cast stone. A concave joint is recommended for the best protection against leakage although other joint types are often available in the stone setting trade.
Pointing mortar should be softer than the stone so that thermal stress will not cause spalling at the edges of the joints. It is usually slightly drier than normal setting mortar consistency to prevent shrinkage and is usually composed of the following:
- 1
part Portland cement, ASTM C150
- 1
part hydrated lime, ASTM C207
- 6
parts masonry sand, ASTM C144
Coloring may be added to achieve almost any hue, however pointing mortar which sharply contrasts with the color of the cast stone may cause staining. Excess pointing material must be sponged away from the face of the stone immediately. Taping the cast stone adjacent to the joints prior to pointing can help protect the cast stone from staining as well. Colors added must be natural or synthetic mineral oxides which meet the requirements of ASTM C979 (sun-fast, lime-proof, alkali-resistant) and the dosage must not exceed 10% of the weight of the cement used. Carbon black or ultramarine blue pigments should not be used. In general, pigmentation types and amounts used in the manufacture of Cast Stone can also be used as a starting point when custom blending the pointing mortar to match or complement the color of the Cast Stone.
Always specify a mockup wall when approving final colors and be sure that it has been properly cleaned because cleaning will usually affect the color of pigmented masonry materials.
This Technical Bulletin addresses generally accepted practices, methods and general details for the use of Architectural Cast Stone. This document is designed only as a guide and is not intended for any specific application or project. It is the responsibility of design and construction professionals to determine the applicability and appropriate application of any detail to a specific project based on professional judgment, specific project conditions, manufacturer's recommendations and solid understanding of product characteristics. The Cast Stone Institute makes no express or implied warranty or guarantee of the techniques or construction methods identified herein. Technical references shall be made to the edition of the International Building Codes for the location of the structure, the latest edition of the TMS 402/406 Masonry Standards document and TMS 404, 504, 604 Standards for Design, Fabrication and Installation of Architectural Cast Stone.
The Cast Stone Institute (CSI) is a not-for-profit organization created to advance the design, manufacture and use of Architectural Cast Stone. To further this goal, the CSI continually disseminates information to targeted construction industry audiences through presentations, programs and technical publications.
|
< < < RETURN
TO TOP

The decision to use mortar with tooled joints or sealant joints between stones is common. To ensure performance, a professional designer or engineer should be consulted for proper joint design. In general, all cast stone sections with projecting profiles, exposed top joints or rigid suspension connections to the supporting structure should be "soft" sealant joints. Furthermore, "soft" sealant joints are recommended for conventional masonry units, all head joints at coping stones, column covers, cornices, platforms, soffits, window sills and larger than conventional masonry units (1ft. 6 in. tall by 2ft. 6 in. in length) for vertical applications.
 Tooled mortar joints are best suited for masonry-bound trim items such as belt courses, lintels, window surrounds, date stones, inscription blocks, quoins, keystones and similar applications. Rake and point the mortar joints rather than full-bed setting and finishing in one operation. (See Technical Bulletin #44 on Pointing.) Tooled mortar joints are best suited for masonry-bound trim items such as belt courses, lintels, window surrounds, date stones, inscription blocks, quoins, keystones and similar applications. Rake and point the mortar joints rather than full-bed setting and finishing in one operation. (See Technical Bulletin #44 on Pointing.)
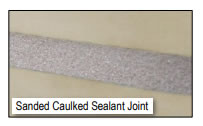
Sealant joints allow for movement at the vertical joints. Leave head joints dry when setting. An allowance for expansion and contraction is required for the system to be effective. After setting, prime the ends of the stones (if necessary), insert properly sized foam backup rod and gun in sealant. If a mortared appearance is desired, a sanded sealant may be used.
 Sealant systems are not intended to bear weight, so plastic setting pads or lead shims are required when setting the cast stones. The sealant is not intended to adhere to the foam backer rod. The sealant should adhere to the parallel surfaces only. The foam rod should be placed to a depth approximately equal to the width of the joint. Sealant systems are not intended to bear weight, so plastic setting pads or lead shims are required when setting the cast stones. The sealant is not intended to adhere to the foam backer rod. The sealant should adhere to the parallel surfaces only. The foam rod should be placed to a depth approximately equal to the width of the joint.
The most common types of sealants are one-part "moisture cure" or "air cure." Two part systems are also available which require the mixing of materials together to allow chemically induced curing.
The inherent properties of silicone products make them excellent sealant materials. Silicones provide superior weathering resistance and perform over a wide range of service temperatures. They are easy to apply, have low shrinkage rates, and can accommodate high movement. While organic materials tend to crack, dry up, and become brittle or even revert with age, silicones remain flexible and durable. Silicone sealants allow for elongation and compression up to 50% of the joint width.
Two-component, polyurethane sealants are tough and elastic, allowing for movement of up to 50% of the joint width. They are also durable, flexible and form a watertight bond with most building materials. Polyurethane sealants may not be suitable for all geographic locations.
The sealant manufacturer should be consulted to ensure the proper sealant is used for each application.
Minimum required allowance for thermal and other movement should be provided in the specification for the project or specified by the design engineer.
This Technical Bulletin addresses generally accepted practices, methods and general details for the use of Architectural Cast Stone. This document is designed only as a guide and is not intended for any specific application or project. It is the responsibility of design and construction professionals to determine the applicability and appropriate application of any detail to a specific project based on professional judgment, specific project conditions, manufacturer's recommendations and solid understanding of product characteristics. The Cast Stone Institute makes no express or implied warranty or guarantee of the techniques or construction methods identified herein. Technical references shall be made to the edition of the International Building Codes for the location of the structure, the latest edition of the TMS 402/406 Masonry Standards document and TMS 404, 504, 604 Standards for Design, Fabrication and Installation of Architectural Cast Stone.
The Cast Stone Institute (CSI) is a not-for-profit organization created to advance the design, manufacture and use of Architectural Cast Stone. To further this goal, the CSI continually disseminates information to targeted construction industry audiences through presentations, programs and technical publications.
|
< < < RETURN
TO TOP
|
|
 |